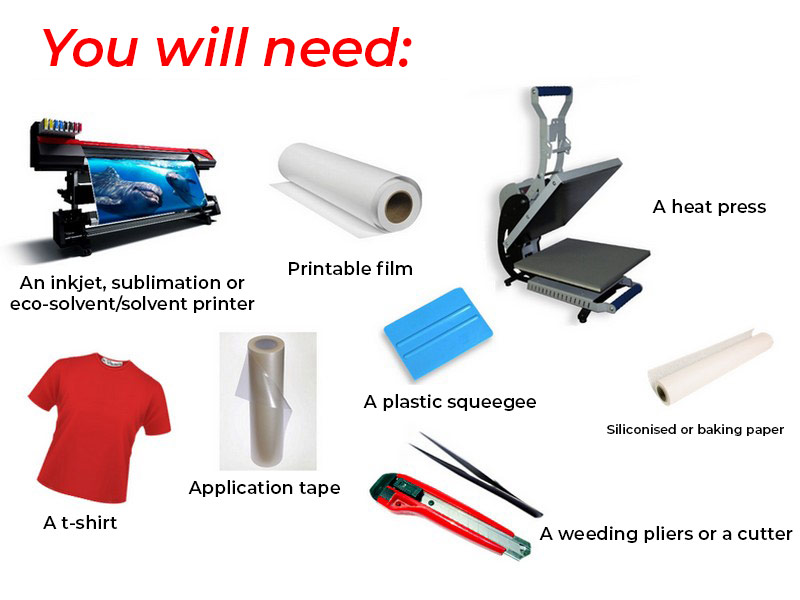
Step 1: Using drawing software, create endless files that look like you to personalize all your media. Don't forget to also create the die cuts which will be very useful after printing your design.
Step 2: Using the drawing software and after inserting the transfer film into the printer, check that your creation is the correct dimensions and that it is not necessary to mirror it on your computer screen. After checking, you can start printing, the printer will then work on its own. You must place the transfer film as follows: the plastic polyester facing down, against the heated bed of your printer. When printing is complete, the printer will need to cut out the outline of the design created previously on the file. If the printer does not have the "Cut" option, you will need to print your creation with marks and then pass the printable film through your cutting plotter which will automatically recognize the cutting lines. After printing and cutting, allow to dry for at least 4 hours before continuing your work.
Step 3: The next step is to weed the excess material. This part consists of removing the excess part of the film which will not be present on the final marking. You can remove the material with a hook, pliers or a cutter. Be careful to remove small cuts and details. Once the stripping is complete, you have to "tap" the product so that it can then be transferred to the textile. There are 2 possibilities: transfer the product by hand if it is thick enough and if the design is in 1 piece or, use a tape application. The tape application is a transparent adhesive film that separates the polyester backing from the marking. To do this, apply the tape application to the marking and remove the air bubbles using a plastic squeegee.
Step 4: Once part 3 is finished, the marking is ready to be placed on the textile support. All you have to do is place your visual on the textile support flat, the application tape plastic on top. Before closing the press, it is recommended to protect the press plate as well as the marking with a sheet of siliconized paper or greaseproof paper You can then carry out the pressing respecting the temperature and duration indications by referring to the product data sheets.
Step 5: Last step, once the marking is out of the press, remove the hot or cold tape application from your textile, depending on the conditions specified on the technical sheet of the product used.
IT'S OVER, YOUR TEXTILE IS 100% CUSTOMIZED!


 En
En